PORTRAIT 1
I’ve been looking at Chantal Joffes’s work and how she paints in quite a simple style with slight distortions of features. she breaks some rules of formal portrait painting. The shadow between the lips is just a brown line for instance. It reminds me a little of Lucien Freud’s work where he enlarges features, eyes for instance, to add impact.
I wanted to use an expression with some emotional intensity, and more of a sad face. This is the kind of face I see a lot in my work as a doctor – in the corridor people are cheerful but the mask soon slips in my room. It’s this kind of emotion that I find my personal voice heading in the direction of.
These first A5 prints [the second had some paint added] seemed to be the start of a journey and not the end to me.
A3 oil monoprint on paper
This next print is A3 size and I used a glass plate for the first time instead of the Gelli-plate. This produced quite a different effect. I liked the expression here, but wandered about trying a reduction technique next. This seemed too much like the prints I’ve been making in the exercises so far, and I wanted to develop what I had started in exercise 3.4 with a new direction – the reduction print inspired by my Maggi Hambling exhibition visit.
For theseI painted the figure in black and blocked in and the outside in red oil paint. Then I wiped off with cotton buds and rags. The first is actually the second print off the plate but I used it to practice adding paint with a rag and cotton bud. The second I think is the most successful. It has more variety of marks, and the rag adds a bit of a random element, in the lack of control.
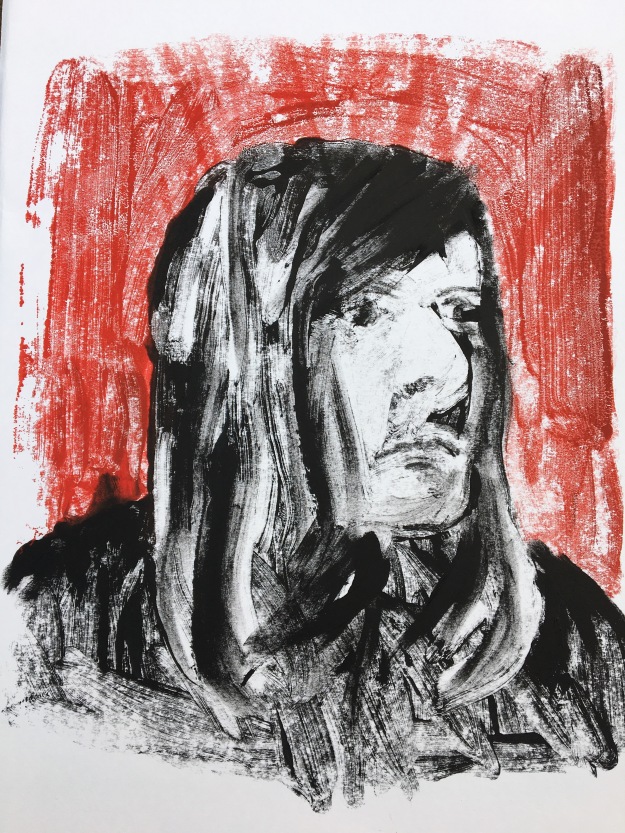
A3 oil monoprint on paper
I think with this one, I achieved the expression I wanted through experimentation. I think the red background contrasts well with the black. I wanted to keep the colour palette bold which I feel meant it needed to be limited. None of these have perfect drawing but I feel it is reasonable, and the imperfect drawing of features is actually what I want I wanted to achieve here. The eyes are too large for instance, but I hope it adds some drama to the expression.
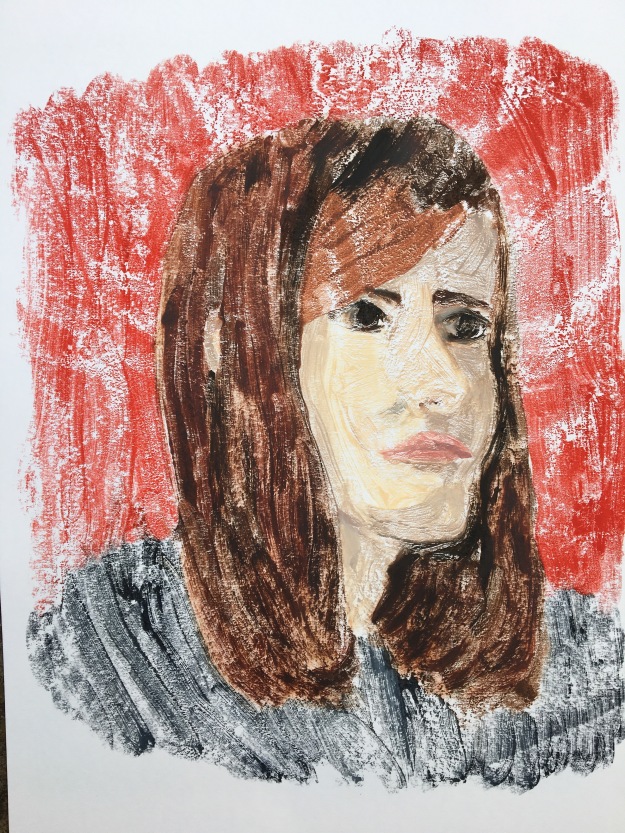
PORTRAIT 2
For this, I was inspired by experiments at the end of exercise 3.4 where I was looking at a side profile. I have been reading Emily Ball’s book ‘Drawing and Painting People’ [1]. She really does offer a fresh approach to painting and I wondered about adapting it for printing too.
Emily Ball is about looking hard, but then making marks in a more expressive way. I wanted to do something quite different with the second work, and decided to use 3 non realistic colours and see how it went.
First, I did a continuous line contour drawing of the face to loosen up and then a couple of exercises from the Emily Ball book where I smeared on graphite and charcoal powder, and used an additive and reductive technique to achieve the image I wanted, finally adding a few fine details. This got me warmed up for the next development work in printing.
I also came across this artist in Emily’s book, and the different use of colour in this self portrait inspired me to try something quite different to what I’ve been printing so far.
I thought it might be easy just to use 3 random colours but it quickly became clear how difficult it is, after I had an afternoon of failure after failure.
However, these failures made me realise that I need to choose 3 colours that have 3 different tones, from light to dark, and that making use of negative shapes/white space made the print more interesting. The fourth experiment was the closest I got to what I wanted. The background was red paint on a rag after the print had been taken.
A3 oil monoprint on paper
I felt this print was the closest to what I wanted, and I added a few details with a rigger brush, darkened a few areas and added the red background with a paint dipped rag. This made the face stand out, as the red line outlining it got covered.
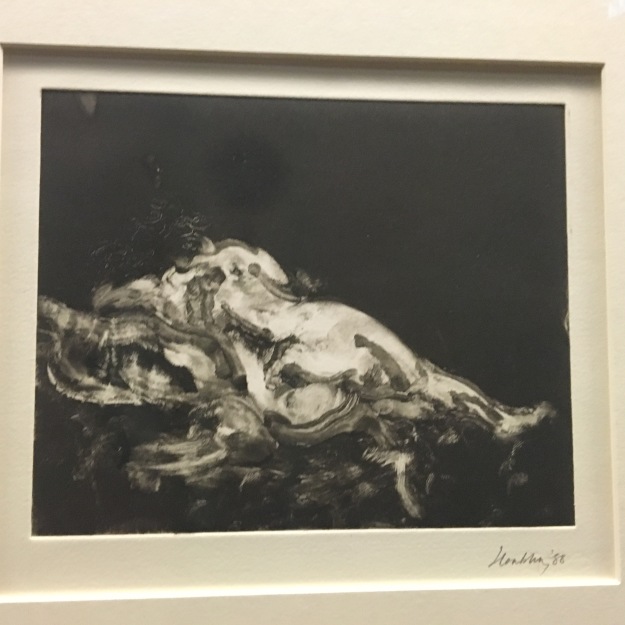
PORTRAIT 3
For this I wanted to try the reductive techniques I had read of Degas, and seen in the Maggi Hambling exhibition visit.
I like her deliberate and confident marks in removing the paint from the board, but have read she uses a metal plate. I still used my glass plate, as I really didn’t want to buy any more equipment at this stage!
I used an image I had painted in part 1, that I remembered had very clear tonal definition and strong shapes. I tried out a sketch with the charcoal dust.
I was really pleased with the first print, and added a few details to it with a rigger.

Enter a caption
A3 oil monoprint on paper
I could have got a more even finish like Maggi Hambling by using a roller to put the paint on the glass, but I actually quite like the painterly marks left by the brush. I like the composition of only part of the face visible, as this contrasts with the more conventional poses of the first two portraits.
ARRANGEMENTS
I like the arrangement of Annie Kevans of her dictators as children portraits. It’s at eye level and flows around the room.
Eleanor Moreton has a similar theme.
Luc Tuymans is one of my favourite artists, and I found this arrangement close together, but they are related objects, which mine are not.
Yuko Nasu uses a double linear row here. With multiple paintings this looks effective, but not with the three I have!
I tried a few combinations first not using the linear scheme.
but felt the long row would look better.
I decided I preferred the last, because there was some space between them, the outside portraits both faced the larger central one.
REFLECTIONS
Demonstration of visual skills; Its been trial and error here with the completely new printing technique. Frustrating at first, it’s been a steep but exciting learning curve. I think my drawing has stood up to the test. I’ve only used oil paint, because of not wanting to buy too many new materials in case I never print again. Having said that, I have ordered some Sakura print oils to try, because they stay wet for so long – something I’ve struggled with in this hot weather. I’ve tried Gelli plates and glass of different sizes – I’m glad I went up to A3 for the assignments. I’ve been using different brush sizes, as pointed out by my tutor in assignment 1.
Quality of outcome; I think I’m becoming more discerning in knowing what’s successful and what isn’t. For example the afternoon of failures with portrait 2 being discarded and a fresh attempt being made the next day. Sometimes things have to be put down to learning, and seen in that context rather than as failures.
Demonstration of creativity; this wasn’t coming through at first as I stuck with my usual style while I tried to master some printing technique! Finally in this assignment I feel I’ve really experimented, building on the previous exercises where I discovered painting with rags, reduction technique and different composition ideas [eg. using parts of a face].
Context; With this course, I find I’m discovering more and more contemporary artists that I like. The study visits I continue to attend are helping me to understand artists whose work I had initially not found so interesting [Stanley Spencer and Georgia O’Keeffe]. I’m starting to see what appeals to my working practice the most and my personal voice does seem to be leading me down the road of people/emotions and contemporary issues.
REFERENCES
- Drawing and painting people. Emily Ball. 2009. The Crowood Press